vue-dplayer的安装
npm install vue-dplayer --save在使用vue-dplayer开发视频播放器过程中,关于弹幕功能的问题需要解释一下
- <template>
- <div id="test">
- <vue-dplayer id="dplayer" ref="dplayerRef" class="dplayer" :options="options"></vue-dplayer>
- </div>
- </template>
-
- <script>
- import VueDPlayer from 'vue-dplayer'
-
- export default {
- components: {
- VueDPlayer
- },
- data() {
- return {
- options: {
- lang: "zh-cn",
- preload: 'auto',
- video: {
- type: 'auto',
- url: 'https://api.dogecloud.com/player/get.mp4?vcode=5ac682e6f8231991&userId=17&ext=.mp4'
- }
- }
- }
- },
- created() {
-
- },
- methods: {}
- }
-
- </script>
-
- <style>
- #test {
-
- }
-
- .dplayer {
- height: 400px;
- width: 800px;
- }
- </style>

这是一个非常干净,只有基础播放器功能的代码
前端展示效果如下

然后我们来看一下 DPlayer api 的接口文档地址https://dplayer.diygod.dev/zh/guide.html

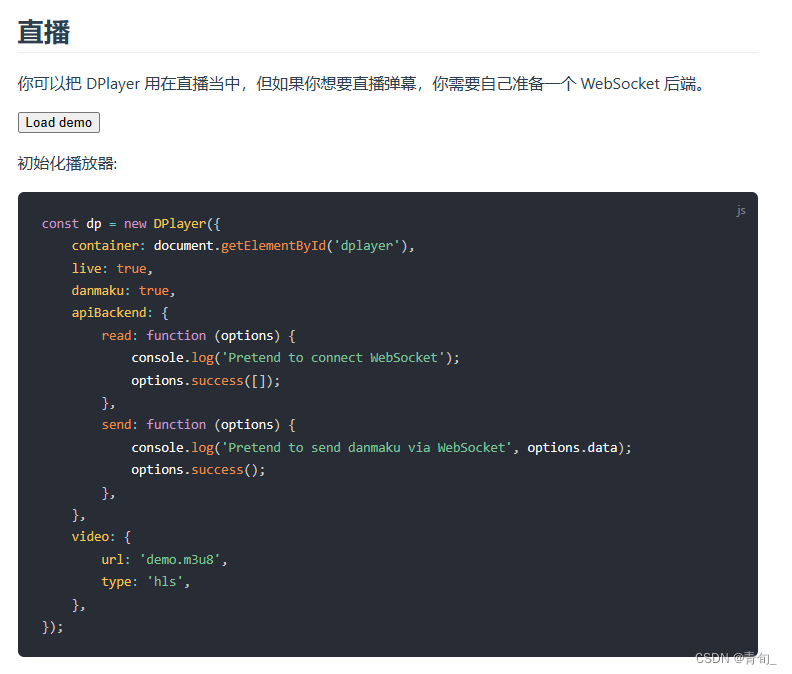
所以options的内容被改为
- options: {
- lang: "zh-cn",
- preload: 'auto',
- video: {
- type: 'auto',
- url: 'https://api.dogecloud.com/player/get.mp4?vcode=5ac682e6f8231991&userId=17&ext=.mp4'
- },
- danmaku: true,
- apiBackend: {
- read (options) {
- console.log('Pretend to connect WebSocket');
- options.success([]);
- },
- send (options) {
- console.log('Pretend to send danmaku via WebSocket', options.data);
- options.success();
- },
- }
- }
结果前端报错:
TypeError: options.success is not a function
[Vue warn]: Error in mounted hook: "TypeError: options.success is not a function"
意思是没有options.success这个方法
怎么会没有呢,都是按照文档的步骤来的呢
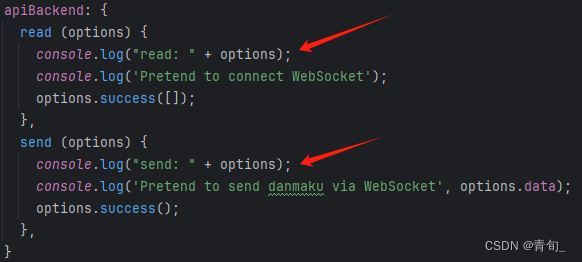
输出这两条试试
read: undefinedv2/?id=undefined
send: undefinedv2/
其实看到这我就知道了,如果把官方给的danmaku.id 和 danmaku.api 加上去的话就能拼成一个完整的url
可就算这样也不能使用options.success()这个方法,没办法只能看源代码
DPlayer/blob/master/demo/demo.js
从这段demo.js代码中可以找到https://s-sh-17-dplayercdn.oss.dogecdn.com/1678963.json这个示例数据,大概是长这样子的
- {
- "code": 0,
- "data": [
- [
- 230.523,
- 0,
- 16777215,
- "618c713c",
- "键盘妹子挺好看?"
- ],
- [
- 25.837,
- 0,
- 16777215,
- "6b2884ac",
- "Goose house炒鸡棒!!! 银之匙种草他们组合"
- ],
- [
- 235.243,
- 1,
- 16707842,
- "929815d3",
- "刚才说比其他翻唱都好听的你是认真的么,这。就是原唱"
- ],
- ...
- ]
- }
为什么是长这个样子的呢?我后面再讲,咱们先继续往下看
找到被作者注释掉的read 和 send方法,看看作者是怎么写的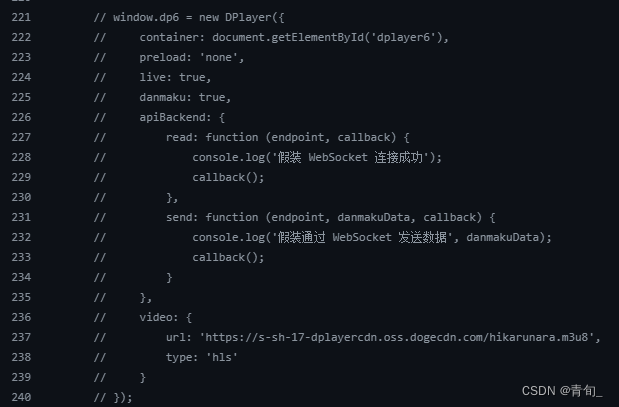
原来传了不止一条数据,我就奇怪了为什么options.success()这方法找不到
我们在read方法中用 console .log('callback: ' + callback); 看看callback有什么
- callback: function (s, r) {
- if (++a, s)
- s.response ? n.options.error(s.response.msg) : n.options.error("Request was unsuccessful: " + s.status), i[o] = [];
- else {
- var l = ["right", "top", "bottom"];
- i[o] = r ? r.map(function (e) {
- return {
- time: e[0],
- type: l[e[1]],
- color: e[2],
- author: e[3],
- text: e[4]
- };
- }) : [];
- }
- if (a === e.length)
- return t(i);
- }
拿 [230.523, 0, 16777215, "618c713c", "键盘妹子挺好看?"] 这条数据来看的话,相当于
- {
- time: 230.523,
- type: "right",
- color: "#fff",
- author: "618c713c",
- text: "键盘妹子挺好看?"
- }
其中color需要将10进制转成16进制
文档中有给出danmaku.id danmaku.api这两条数据给我们使用,但是实际上作者会给你的api上加条非常诡异的后缀 v2/?id=,控制台能看到他调用api接口,但是弹幕就是加载不上去。
解决办法
我们不能使用作者提供的danmaku.id danmaku.api,需要自己覆写read send方法
- import {getDanmuList, addDanmu} from '@/api/video/videoDanmu'
-
- options: {
- lang: "zh-cn",
- preload: 'auto',
- video: {
- type: 'auto',
- url: 'https://api.dogecloud.com/player/get.mp4?vcode=5ac682e6f8231991&userId=17&ext=.mp4'
- },
- danmaku: true,
- apiBackend: {
- send: (endpoint, danmakuData, callback) => {
- const danmu = {
- color: danmakuData.color,
- type: danmakuData.type === 'right' ? 0 : danmakuData.type === 'top' ? 1 : 2,
- text: danmakuData.text,
- time: danmakuData.time
- }
- addDanmu(danmu).then((response) => {
- this.$notify({
- title: '弹幕发送成功',
- message: danmu.text,
- type: 'success'
- });
- callback();
- }).catch((error) => {
- this.$notify.error({
- title: '失败',
- message: '弹幕发送失败 ' + error,
- });
- })
- },
- read: (endpoint, callback) => {
- getDanmuList(this.video.id).then((response) => {
- if (!response || response.code !== 0) {
- endpoint.error && endpoint.error(response && response.msg);
- return;
- }
- callback('', response.data);
- }).catch((e) => {
- console.error(e);
- endpoint.error && endpoint.error();
- });
- }
- }
- }
send方法中的danmakuData参数就是用户填写的弹幕信息,大概就是这样的json数据
- {
- "color": "#fff",
- "type": 0,
- "text": "123",
- "time": 0
- }
可以选择自己重新包装一层,看你要设计成什么样的 数据结构 。最后一定要调用callback()方法将发送弹幕的对话框关闭掉
read方法要注意一下,因为作者设计的接口数据格式非常逆天,在调用了自己的后端接口获取到弹幕数据之后,一定要改成这样格式的数据
- [
- [
- "5.713021",
- 0,
- "#fff",
- "c3cad6e5",
- "嗨哈嗨"
- ],
- [
- "2.572623",
- 0,
- "#fff",
- "c3cad6e5",
- "嗨嗨嗨"
- ],
- ...
- ]
然后像这样子callback('', response. data )塞到播放器里面就可以发送弹幕了

这是我的个人博客,里面有很多经典案例,感兴趣的可以一起来学习 blog.qxbase.com